
12 volt
Gas
240 volt
Fridge
Problem:
One of the problems with the 3 way fridges, is that they can over heat and not perform very well. You often read of comments on FB that their fridge has not kept their food cold, and the freezers are defrosting. My beer is not keeping cold, or my ice-cream keeps melting?
Then you will see many comments of folk saying ,get rid of the 3 way fridge and get a 12 volt compressor fridge or perhaps a standard 240 volt domestic fridge and use solar with inverters, and so the advice will go on.
I have to say, that I have had our motor home for some 13 years now. I have had no major problems with it, in all that time. Mostly if there is a problem it is because some stupid mistake I made or you just open and close it too much when it is 48 degrees in the shade.
I have to say the 240 volt side of things are concerned, the element is delicate to say the least. So in a electrical storm or power surge, you will find it not uncommon to have it fritz. The other problem with fridges not keeping their cool, is the fact that the manufacturers have not ventilated the fridge area correctly and thus the fridge overheats and so won't keep it's cool. Most things can be remedied.

Process:
So what can we do to address some of these issues and remedy them so that we can get max enjoyment of the fridge we have. So first things first. Looking below you will see a section Reading and Research Material. Click through the videos and do watch them, there is a wealth of knowledge to be gleaned from them. The guy from RVWorks is very good and whilst it is American, they are the same 3 way fridges from Dometic. I have a PDF below, and I can not think for the life of me where I got it but it is a very good read. If I find out the author I will indeed link it to him / her.
So first things first. BASIC CHECK.
For 240v - is it plugged in and the plugs are ok?
Gas - is it turned on and is there gas in your bottle?
Battery - is there enough charge?
OK, now lets sort things out, here we go.
1. Cabinet Space and Insulation:
When you remove the back vents of the fridge on the outside of your RV you will see how the fridge is installed and insulated with hopefully the right amount of space for aeration and cooling. You should also see if the fridge has appropriate insulation to keep it cool in the cabinet area.
2. Top Venting:
The fridge area has a bottom vent and a top vent. The idea behind that is hot air rises, and there for cooler air comes in from the bottom, and then expires out via the top vent as it rises. Now to help this process along a little better, you can fit fans in the area, to help expel the air quicker and make sure that air is drawn in fresh via the bottom vent and then pushed effectively out the top.
I have two fans wired together on a wire rack that is zip locked to the vent itself. It is wired in to a 12 volt switch that I have re wired for the electrical supply. When it gets warm I just flick the switch and run the fan for as long as it is needed. Now there are some clever clogs out there that have also fixed a sensor to the fridge so that when it reaches x amount of degrees, the fan cuts in and when it drops to x amount of degrees, the fan cuts out. This also is brilliant, but for me I like to head of the problem early with the flick of the switch. For me it is no big deal. You will see from my photo below how I wired it in.
Fix: I took a cheap cake cooling wire rack bought from St Vinnies and bought 2 computer fans. I used computer fans because they are extremely efficient, and extremely quiet. These can be purchased from Ebay. I zip locked them to the wire rack that I cut down to the size required to fit in the space on the vent itself. The fans are wired together in unison, and then wired in to the 12 volt switch. When turned on they use less than 1/2 an amp. NICE!
3. Bottom Vent
The bottom vent needs a little attention as well. On extreme windy days, and you are not able to escape a pounding wind you might find the gas jet of the fridge will be blown out. Hence , fridge not cooling with out you knowing. So when on gas I make it a matter of fact to always check the gas indicator when I am on gas. Just because for many a reason the thing can go out. Wind, no gas, blocked jet, failed igniter and so on. So when I pop the kettle on or go to fridge to get some thing I just quickly glance at indicator.
OK so, how to fix the wind issue?
Fix: I cut and shaped some card board and taped with Gaffa tape the very bottom fin on the vent to create a up draft , away from the direct jet that fuels the burner. Have a squiz at the picture below and you will soon see what I mean.
4. Power Surge
The 240 element on these fridges are more delicate than the froth on me beer. Seriously any power surge, or electrical storm can fritz these little blighters.
Fix: Buy a 240 volt surge protector with a indicator, and plug it in with the fridge. This way the surge protector will keep things ticking along nicely. Trust me, you will thank me latter.
5. Level Vehicle
This problem is a simple fix. If the vehicle is leaning to far to one side or another or on a sloping ground, many fridges will chuck a right wobbly and not work. Also it is very bad news for the gas coolant in the fridge to be to one particular side or another. This will soon render your fridge in operable.
Fix: Simple really, just level out your vehicle one way or another. Find a better level spot. Use wheel ramps. Use levelling jacks. For me, as I do not have the said $10,000.00 leveling jacks, I just drive to flat ground if I can. If not, because the spot I am parking in, is so stunning that I do not wish to move, I just get out my leveling ramps and sort it out that way. I carry to sets, that way I have heaps of options. Boom! Too Easy!
6. Initial Cooling
Make sure that when you are ready to set of on your next jaunt, pre-cool your fridge correctly. Set it up a couple of days before hand. I usually set it to about 4 or so, and 2 days before I go away. I place a tiny plastic container with a small amount of water and place in freezer section. With in 2 hours I know that my fridge is well under way to cooling. If not it alerts me to potential problems. I also on extreme hot days, if that be the case, I use large ice-blocks from house freezer and place in RV fridge to help the process get started and lend a wee hand to starting the cooling process. Trust me your fridge will thank you.
7. Loading fridge
When you start loading your fridge, it also helps if the items you put in there are either already frozen, or very cold. I quickly load the fridge the day before giving it plenty of time to settle it self down. So 2 days before hand I get fridge on and ready. On day before load it up. and then it has the days to prepare for the journey. Remember that on 12 volt the fridge operates at it's worst efficiency. So have it well cooled before leaving.
8. Dirty Jet and Flu
Watch the videos below, and make sure that annually you inspect clean and maintain a nice clean burner, and flu. This will increase efficiency no end. Folks who whinge and whine about gas fridges, you will find have probably never cleaned and maintained their burner and flu. NOTE: DO NOT play with the jet. Just use compressed air. These jets are very delicate. Be warned.
a. Common service on gas needs doing
b. Jet clean
c. Flu clean
d. Gas pressure checked at burner
e. Flame needs to be burning a blue colour
f. Flu heat tube needs to eject heat to the outside of van
9. Fridge Seals
Goes with out saying but make sure your seals on doors are effective. Do the paper test. Take a piece of paper and place inbetween door and fridge when closed. pull the paper out, it should not want to come out. It should be well gripped by the door seal. Go right around the fridge door testing every 12 inches or so and make sure seals are in good working order.
10. Fluid Drain Hose
All fridges have a drain hose at the back. If this is obstructed, and fluid can not come out as required, it will stuff up your fridge. Make sure the flow is OK and that nothing is blocking it. No insect crawled up there, or no wasp has made their nest up there. It is also a problem if it is not directed to the drip tray under the fridge. Condensation should come from that tube. Run into the evap tray and dissipate via the heat generated by the fridge. If this is not placed correctly, fluid will run where ever it pleases, and you will find ROT somewhere under your fridge or wall cavity. This is a very expensive repair job. So do your self a favour and check that the drain tube is correctly placed and free of obstruction.
11. Keep fridge side of vehicle out of direct sun.
If possible park so that the burning sun of summer is not on the side of the vehicle where the fridge is located. Keep it shaded if possible. If this is not possible, perhaps use a small shade sail, to shade the fridge vent area. You can buy cheap awning track, and then some shade cloth. Stitched to create a nice little sail that can be pegged to the ground and hence you now have a shaded fridge vents.
12. Keep motor-home fridge vent out of heavy direct winds if possible, face another way if you can. Not always possible, I know.
13. Fuse. Just may be a fuse has blown give that a quick check.
14. Re-Set.
Some of the newer models of fridges have a reset button on the panel, or in the back. Have a look through your manual, and find out if it has one. Perhaps for some unknown reason the thing has been tripped.
15. Power Point Plug. Maybe the 240 volt is not working because simply the plug has fallen out.
16. Auto switch over, or manual.
Sometimes it just needs to sit for 10 to 15 mins before changing from 12volt whilst traveling to gas. I have read a number of times the more recent fridges, like to sit for a wee while. Perhaps set up a little, make a cup of tea, and then give it a go on the gas.
17. See Amendments below for updates:
OK, so a quick tick n flick.
A. Do Install dual fans
B. clean gas jet area and flu
C. use power surge protection
D. keep fridge as full as possible, allowing for good internal air flow
E. keep freezer full
F. keep aerated
G. keep fridge side out of sun
H. keep well ventilated
I. keep vehicle level
J. Check Drain Pipe
k. Check fuse
l. check level
m. check power plug
n. check reset button
o. let sit for 15 - 20 mins then turn on to gas
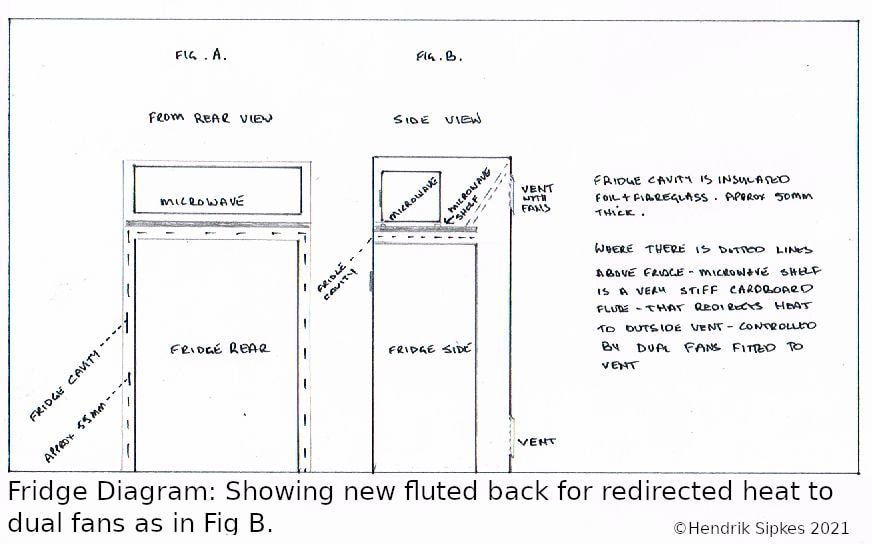
p. fit flute at back of microwave fridge area to re direct the heat to the fan. see diagram hand drawn for further
Final Notes on 3 Way Fridges:
The best way to look at 3 way fridges is if you understand the purpose for 3 way and when to use what and when.
Gas:
Gas setting is for the use when free camping and you just have the best solution for free camping. Gas is economical, efficient and does the job just perfectly. You need to have the fridge set to mark 4, when lighting the fridge. I never knew this for quite sometime, but it does make a difference. So when you pull up, after a long run. Set to the mark 4, make a cup of tea. When you have had your cup of tea, then try and light your fridge. You will find it goes better and lights quicker as well.
240Volt:
This is for when you want to start the fridge up after being off. So you are going to set of in a couple days. Turn fridge on 240v 2 days before leaving. Put on setting4. If the weather is extraordinarily hot, I will put ice block bottles in freezer to help get it started.
Then when you arrive at your destination and you have access to power this is when you use that. Plug in and you are set to go.
12volt:
This is strictly for traveling. It is there to maintain the level of cold when you are traveling only. You can not use this as a option for free camping. The fridge uses between 15 and 20 amps. So your batteries will die the death in a very short period. That draw is so severe that if allowed to be used you can ruin your batteries.
As soon as I pull up before turning the motor off I turn the 12v off. Let sit a couple minutes and then move to gas, or electric as required.
Manuals :
There are a couple of links below for 2 manuals for maintenance, fault finding and diagnostics. I can not think for the life of me where I obtained them. 1 is a pdf gas_fridge_problems and clicking the grey link will get it for you, or find it at the bottom of this page. Then there is a manual that Dometic service fault Diagnostic manual. So no.2. The Service Manual for Dometic service technicians. Your welcome to use both and download if you like. I hope they are of some use.
So what can we do to address some of these issues and remedy them so that we can get max enjoyment of the fridge we have. So first things first. Looking below you will see a section Reading and Research Material. Click through the videos and do watch them, there is a wealth of knowledge to be gleaned from them. The guy from RVWorks is very good and whilst it is American, they are the same 3 way fridges from Dometic. I have a PDF below, and I can not think for the life of me where I got it but it is a very good read. If I find out the author I will indeed link it to him / her.
So first things first. BASIC CHECK.
For 240v - is it plugged in and the plugs are ok?
Gas - is it turned on and is there gas in your bottle?
Battery - is there enough charge?
OK, now lets sort things out, here we go.
1. Cabinet Space and Insulation:
When you remove the back vents of the fridge on the outside of your RV you will see how the fridge is installed and insulated with hopefully the right amount of space for aeration and cooling. You should also see if the fridge has appropriate insulation to keep it cool in the cabinet area.
2. Top Venting:
The fridge area has a bottom vent and a top vent. The idea behind that is hot air rises, and there for cooler air comes in from the bottom, and then expires out via the top vent as it rises. Now to help this process along a little better, you can fit fans in the area, to help expel the air quicker and make sure that air is drawn in fresh via the bottom vent and then pushed effectively out the top.
I have two fans wired together on a wire rack that is zip locked to the vent itself. It is wired in to a 12 volt switch that I have re wired for the electrical supply. When it gets warm I just flick the switch and run the fan for as long as it is needed. Now there are some clever clogs out there that have also fixed a sensor to the fridge so that when it reaches x amount of degrees, the fan cuts in and when it drops to x amount of degrees, the fan cuts out. This also is brilliant, but for me I like to head of the problem early with the flick of the switch. For me it is no big deal. You will see from my photo below how I wired it in.
Fix: I took a cheap cake cooling wire rack bought from St Vinnies and bought 2 computer fans. I used computer fans because they are extremely efficient, and extremely quiet. These can be purchased from Ebay. I zip locked them to the wire rack that I cut down to the size required to fit in the space on the vent itself. The fans are wired together in unison, and then wired in to the 12 volt switch. When turned on they use less than 1/2 an amp. NICE!
3. Bottom Vent
The bottom vent needs a little attention as well. On extreme windy days, and you are not able to escape a pounding wind you might find the gas jet of the fridge will be blown out. Hence , fridge not cooling with out you knowing. So when on gas I make it a matter of fact to always check the gas indicator when I am on gas. Just because for many a reason the thing can go out. Wind, no gas, blocked jet, failed igniter and so on. So when I pop the kettle on or go to fridge to get some thing I just quickly glance at indicator.
OK so, how to fix the wind issue?
Fix: I cut and shaped some card board and taped with Gaffa tape the very bottom fin on the vent to create a up draft , away from the direct jet that fuels the burner. Have a squiz at the picture below and you will soon see what I mean.
4. Power Surge
The 240 element on these fridges are more delicate than the froth on me beer. Seriously any power surge, or electrical storm can fritz these little blighters.
Fix: Buy a 240 volt surge protector with a indicator, and plug it in with the fridge. This way the surge protector will keep things ticking along nicely. Trust me, you will thank me latter.
5. Level Vehicle
This problem is a simple fix. If the vehicle is leaning to far to one side or another or on a sloping ground, many fridges will chuck a right wobbly and not work. Also it is very bad news for the gas coolant in the fridge to be to one particular side or another. This will soon render your fridge in operable.
Fix: Simple really, just level out your vehicle one way or another. Find a better level spot. Use wheel ramps. Use levelling jacks. For me, as I do not have the said $10,000.00 leveling jacks, I just drive to flat ground if I can. If not, because the spot I am parking in, is so stunning that I do not wish to move, I just get out my leveling ramps and sort it out that way. I carry to sets, that way I have heaps of options. Boom! Too Easy!
6. Initial Cooling
Make sure that when you are ready to set of on your next jaunt, pre-cool your fridge correctly. Set it up a couple of days before hand. I usually set it to about 4 or so, and 2 days before I go away. I place a tiny plastic container with a small amount of water and place in freezer section. With in 2 hours I know that my fridge is well under way to cooling. If not it alerts me to potential problems. I also on extreme hot days, if that be the case, I use large ice-blocks from house freezer and place in RV fridge to help the process get started and lend a wee hand to starting the cooling process. Trust me your fridge will thank you.
7. Loading fridge
When you start loading your fridge, it also helps if the items you put in there are either already frozen, or very cold. I quickly load the fridge the day before giving it plenty of time to settle it self down. So 2 days before hand I get fridge on and ready. On day before load it up. and then it has the days to prepare for the journey. Remember that on 12 volt the fridge operates at it's worst efficiency. So have it well cooled before leaving.
8. Dirty Jet and Flu
Watch the videos below, and make sure that annually you inspect clean and maintain a nice clean burner, and flu. This will increase efficiency no end. Folks who whinge and whine about gas fridges, you will find have probably never cleaned and maintained their burner and flu. NOTE: DO NOT play with the jet. Just use compressed air. These jets are very delicate. Be warned.
a. Common service on gas needs doing
b. Jet clean
c. Flu clean
d. Gas pressure checked at burner
e. Flame needs to be burning a blue colour
f. Flu heat tube needs to eject heat to the outside of van
9. Fridge Seals
Goes with out saying but make sure your seals on doors are effective. Do the paper test. Take a piece of paper and place inbetween door and fridge when closed. pull the paper out, it should not want to come out. It should be well gripped by the door seal. Go right around the fridge door testing every 12 inches or so and make sure seals are in good working order.
10. Fluid Drain Hose
All fridges have a drain hose at the back. If this is obstructed, and fluid can not come out as required, it will stuff up your fridge. Make sure the flow is OK and that nothing is blocking it. No insect crawled up there, or no wasp has made their nest up there. It is also a problem if it is not directed to the drip tray under the fridge. Condensation should come from that tube. Run into the evap tray and dissipate via the heat generated by the fridge. If this is not placed correctly, fluid will run where ever it pleases, and you will find ROT somewhere under your fridge or wall cavity. This is a very expensive repair job. So do your self a favour and check that the drain tube is correctly placed and free of obstruction.
11. Keep fridge side of vehicle out of direct sun.
If possible park so that the burning sun of summer is not on the side of the vehicle where the fridge is located. Keep it shaded if possible. If this is not possible, perhaps use a small shade sail, to shade the fridge vent area. You can buy cheap awning track, and then some shade cloth. Stitched to create a nice little sail that can be pegged to the ground and hence you now have a shaded fridge vents.
12. Keep motor-home fridge vent out of heavy direct winds if possible, face another way if you can. Not always possible, I know.
13. Fuse. Just may be a fuse has blown give that a quick check.
14. Re-Set.
Some of the newer models of fridges have a reset button on the panel, or in the back. Have a look through your manual, and find out if it has one. Perhaps for some unknown reason the thing has been tripped.
15. Power Point Plug. Maybe the 240 volt is not working because simply the plug has fallen out.
16. Auto switch over, or manual.
Sometimes it just needs to sit for 10 to 15 mins before changing from 12volt whilst traveling to gas. I have read a number of times the more recent fridges, like to sit for a wee while. Perhaps set up a little, make a cup of tea, and then give it a go on the gas.
17. See Amendments below for updates:
OK, so a quick tick n flick.
A. Do Install dual fans
B. clean gas jet area and flu
C. use power surge protection
D. keep fridge as full as possible, allowing for good internal air flow
E. keep freezer full
F. keep aerated
G. keep fridge side out of sun
H. keep well ventilated
I. keep vehicle level
J. Check Drain Pipe
k. Check fuse
l. check level
m. check power plug
n. check reset button
o. let sit for 15 - 20 mins then turn on to gas
p. fit flute at back of microwave fridge area to re direct the heat to the fan. see diagram hand drawn for further
Final Notes on 3 Way Fridges:
The best way to look at 3 way fridges is if you understand the purpose for 3 way and when to use what and when.
Gas:
Gas setting is for the use when free camping and you just have the best solution for free camping. Gas is economical, efficient and does the job just perfectly. You need to have the fridge set to mark 4, when lighting the fridge. I never knew this for quite sometime, but it does make a difference. So when you pull up, after a long run. Set to the mark 4, make a cup of tea. When you have had your cup of tea, then try and light your fridge. You will find it goes better and lights quicker as well.
240Volt:
This is for when you want to start the fridge up after being off. So you are going to set of in a couple days. Turn fridge on 240v 2 days before leaving. Put on setting4. If the weather is extraordinarily hot, I will put ice block bottles in freezer to help get it started.
Then when you arrive at your destination and you have access to power this is when you use that. Plug in and you are set to go.
12volt:
This is strictly for traveling. It is there to maintain the level of cold when you are traveling only. You can not use this as a option for free camping. The fridge uses between 15 and 20 amps. So your batteries will die the death in a very short period. That draw is so severe that if allowed to be used you can ruin your batteries.
As soon as I pull up before turning the motor off I turn the 12v off. Let sit a couple minutes and then move to gas, or electric as required.
Manuals :
There are a couple of links below for 2 manuals for maintenance, fault finding and diagnostics. I can not think for the life of me where I obtained them. 1 is a pdf gas_fridge_problems and clicking the grey link will get it for you, or find it at the bottom of this page. Then there is a manual that Dometic service fault Diagnostic manual. So no.2. The Service Manual for Dometic service technicians. Your welcome to use both and download if you like. I hope they are of some use.

So help keep those beers cold and do a little research and maintenance. You will indeed be a happy chappy.
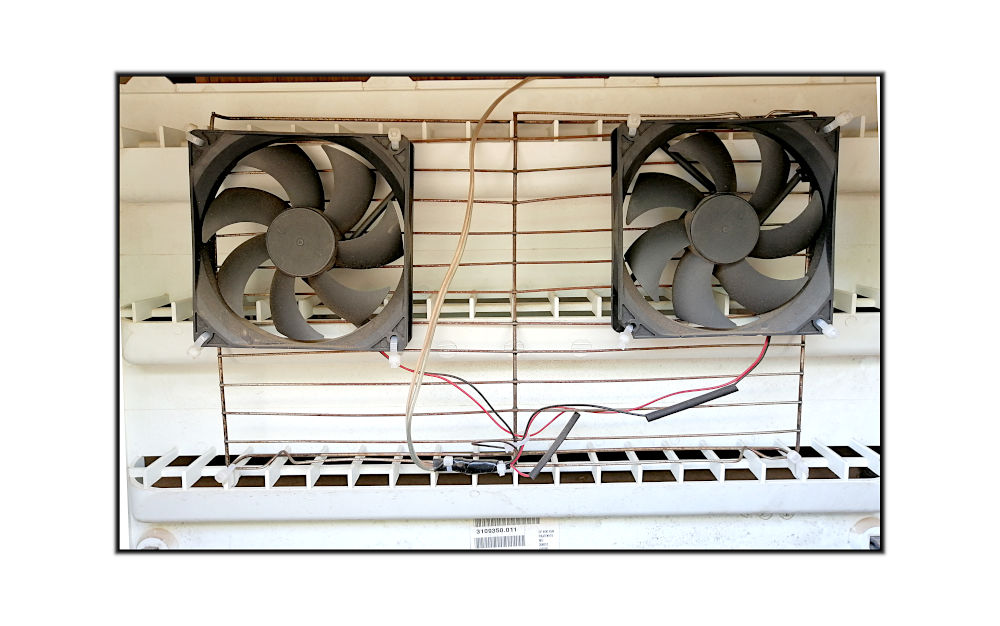
Double Cooling Fan ©Motorhome-Coddiwompler2020
Bottom vent cowling made on the fly. ©Motorhome-Coddiwompler2020
Amendment to Bottom Vent Cowling:-
I have taken the cardboard and tape ad-hoc baffle of the fridge vent that was made during a storm. The wind was so horrendous that it kept on blowing the fridge gas pilot light out. I made the ad-hoc baffle to stop the wind blowing too hard at the level of the burner. It was obviously open at the top allowing the breeze to come in but just directed away from the jet burner.
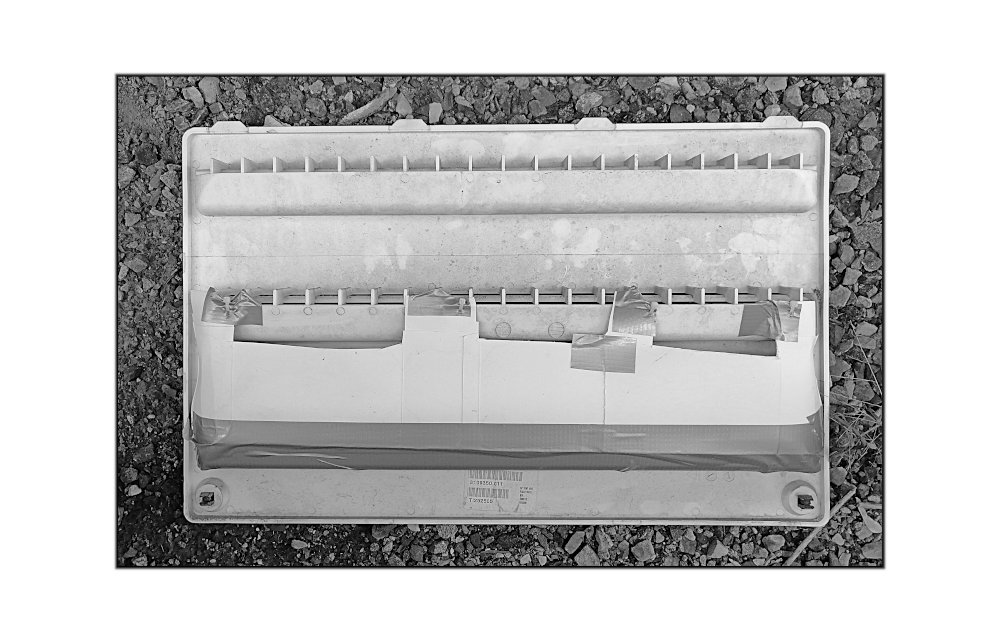
So in the pics below you will see that one is with the ad-hoc baffle removed. There is also a pic of a more permanent baffle in place. I took a plastic contained and cut the sides out of it, and shaped it to the curved baffle that was there. It now has more of a upward draft directing the breeze/wind away from said jet burner. The new cowling is made of 3 pieces of the plastic and is permanent and zip locked in place. I then just lined it with duck tape and sealed it as one piece.
Easy fix, no dollars just a bit of time. Hopefully that will solve the problem. If you are having troubles with keeping that jet burner alight then why not give this a go. It works a treat on mine.
I have taken the cardboard and tape ad-hoc baffle of the fridge vent that was made during a storm. The wind was so horrendous that it kept on blowing the fridge gas pilot light out. I made the ad-hoc baffle to stop the wind blowing too hard at the level of the burner. It was obviously open at the top allowing the breeze to come in but just directed away from the jet burner.
So in the pics below you will see that one is with the ad-hoc baffle removed. There is also a pic of a more permanent baffle in place. I took a plastic contained and cut the sides out of it, and shaped it to the curved baffle that was there. It now has more of a upward draft directing the breeze/wind away from said jet burner. The new cowling is made of 3 pieces of the plastic and is permanent and zip locked in place. I then just lined it with duck tape and sealed it as one piece.
Easy fix, no dollars just a bit of time. Hopefully that will solve the problem. If you are having troubles with keeping that jet burner alight then why not give this a go. It works a treat on mine.
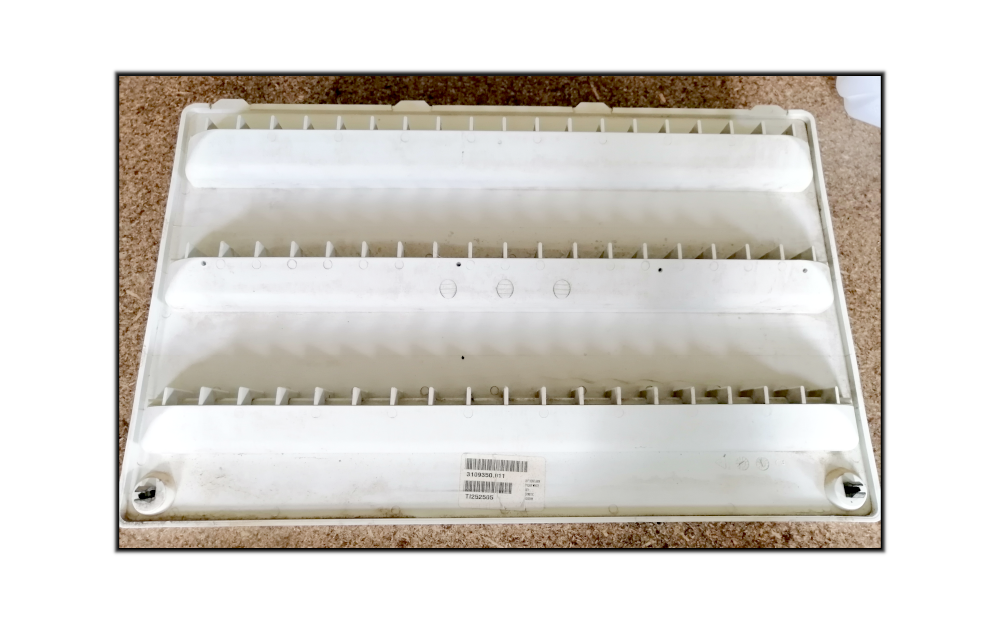
Vent with ad-hoc cowling removed
|

Vent with a more permanent baffle on the cowling
|
Amendment to Dual Fan Area:
Problem :
The area above the microwave was quite a large area. As seen from the drawing below fig A the space above the microwave shelf is very large and can accumulate a lot of hot air.
You will also notice from fig B that the shelf only went half way back just enough to accommodate the microwave. This left a very large area from the back of the fridge top to the vent.
Process:
What I had read by a manufacturer who stated that that area needs to be closed off. So from the back of the microwave shelf to the top of the vent should have a flute that directs air out the vent. Rather than accumulate in the large space. So I created from heavy cardboard a flute to redirect the air and close of that area. Notice where it is placed from the dual double lines from shelf to vent. Now the dual fans really pull that hot air out. It rises into that inverted V area and straight out the vent. The space behind the flute and the back of the microwave is now no longer a place that hot air just accumulates. This causes a heavier draw of fresh air in via the bottom and forced out the top via the vent as hot air rises, and then on hot days pushing the air out via dual fans.
Fridge Aerator Camco
Problem :
The fridge inside can create cold and hot spots. I have noticed that the fridge whilst it has always been nice and cold, has at times frozen my lettuce and tomatoes. Also eggs have frozen. So it depends where in the fridge you put them as to how susceptible they to being too cold.
Process:
To fix this problem I keep eggs in the top shelf in the door. The lettuce and tomato issue was harder to fix. Solution I read in the internet was that you need to circulate the air in your fridge. This way it avoids hot spots or cold spots. By using a fridge aerator blowing air across the fins gives the fridge an easier time of keeping it cool and thus preventing super cold spots. It also cycles the air around the fridge making it easier for the fridge to do it's job. Small investment of around $40.00 including postage (out of USA) it was small price to pay. Great solution and an easy fix.

Reading Material:
Please take the time to look through the resources below, you will glean much. You will be glad you did. Not to mention you will be a cool "Coddiwompler".
Book Mark this page in your favourites, that way you will have a multitude of resources in one click.
You may also click the Gas fridge Problems PDF download at the bottom for your reference.

Reading and Research Material:
Great Resource Here:-
Fridge and Solar .net are a great resource
www.fridge-and-solar.net/Gas-Fridge-Power-Problems.html
Facebook link to Extreme Auto Caravan and Camping
https://www.facebook.com/extremeacc.com.au/
RVDaily :- Keeping your fridge cool in summer
https://magazine.rvdaily.com.au/rv-daily-issue-046/guide-keeping-your-fridge-cool-in-summer
The following Videos on YouTube are by "MyRVWorks.com"
This guy goes into huge amount of reasons and fixes for fridges and the likes.
He has a list of zillions of manuals : https://myrvworks.com/manuals/
He has a list of resources : https://myrvworks.com/resources/darrens-tool-list/
Other viewing material for you:
Troubleshooting A Dometic RV Refrigerator That's Not Working On Propane
https://www.youtube.com/watch?v=A7JboU8ZlE0&list=RDCMUCoKcKA4SuZLCD3flLXZVQvw&start_radio=1&t=139
Troubleshooting An RV Refrigerator That Works On LP But Not On Electric
www.youtube.com/watch?v=2aE_4SuljE4&list=RDCMUCoKcKA4SuZLCD3flLXZVQvw&index=2
mygenerator.com.au
www.mygenerator.com.au/blog/troubleshooting-problems-3-way-caravan-fridge/
That's Not Working On Propane
https://www.youtube.com/watch?v=A7JboU8ZlE0
How To Determine If Your RV Refrigerator Cooling Unit Has Failed PLUS RV Fridge Component Overview
https://www.youtube.com/watch?v=IT_5HGe4q-k
Troubleshooting An RV Refrigerator That Works On LP But Not On Electric
https://www.youtube.com/watch?v=2aE_4SuljE4
How To Diagnose And Replace An RV Refrigerator Heating Element
https://www.youtube.com/watch?v=XoryMLBZueg
Troubleshooting A Dometic RV Refrigerator That's Not Working On Propane
https://www.youtube.com/watch?v=A7JboU8ZlE0&t=98s
|
| ||||
©2021 Motor-Home Coddiwompler
